Fungus Foray

Reading Time: 3 minutes

I kick around at the oak leaf litter hoping to find a mushroom trying to poke its way through the ground cover to scatter its spores to the wind. I avoid all the leafless stems poking up at the base of the big oaks trying to avoid poison oak; even without the leaves, the stems have enough Urushiol to cause irritation. The dry weather of the past couple of weeks has left fungi in short supply. Most of the few mushrooms I find, are already blackened with decay.

DSC_0946_CrossSection

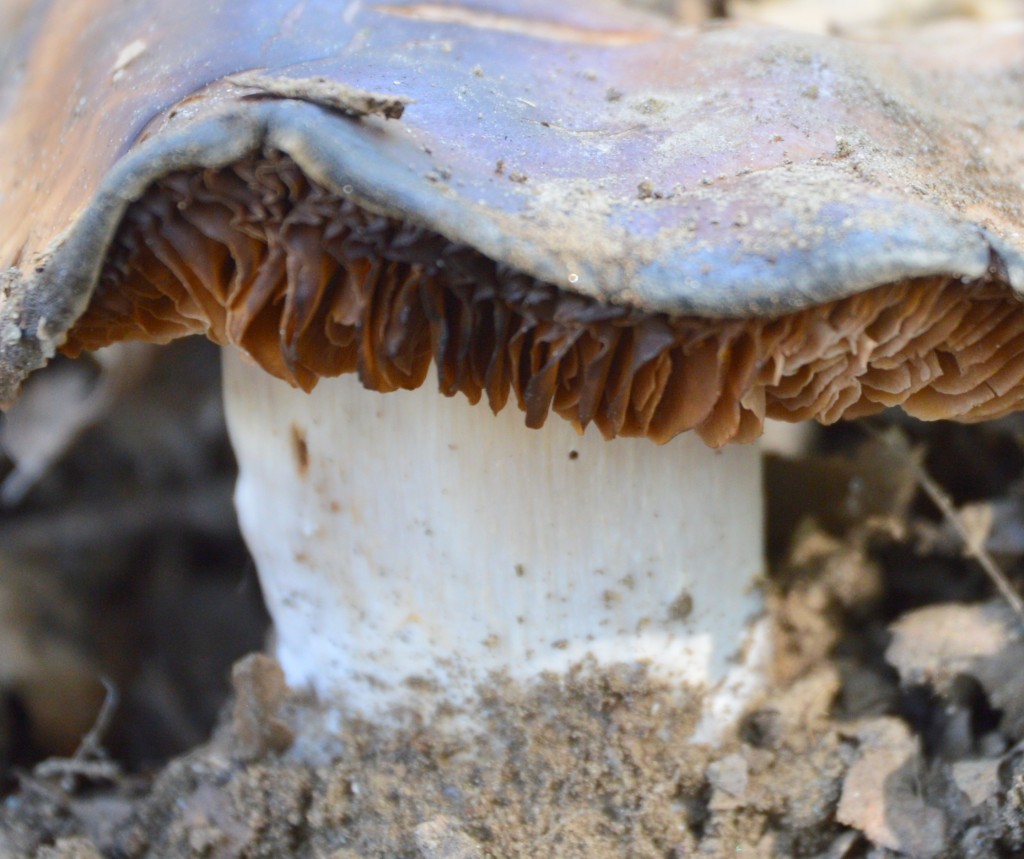
I continue checking out the base of the oak trees. Many species of mushrooms are mycorrhizal symbiants with the oaks. I see a promising disturbance in the ground, kick away the leaves and sticks, to find an intact specimen (identity unknown).  I tidy up the fungus trying to render it presentable, and snap off a few shots. I bag my specimen and move on.

DSC_0960_ShelfShroom

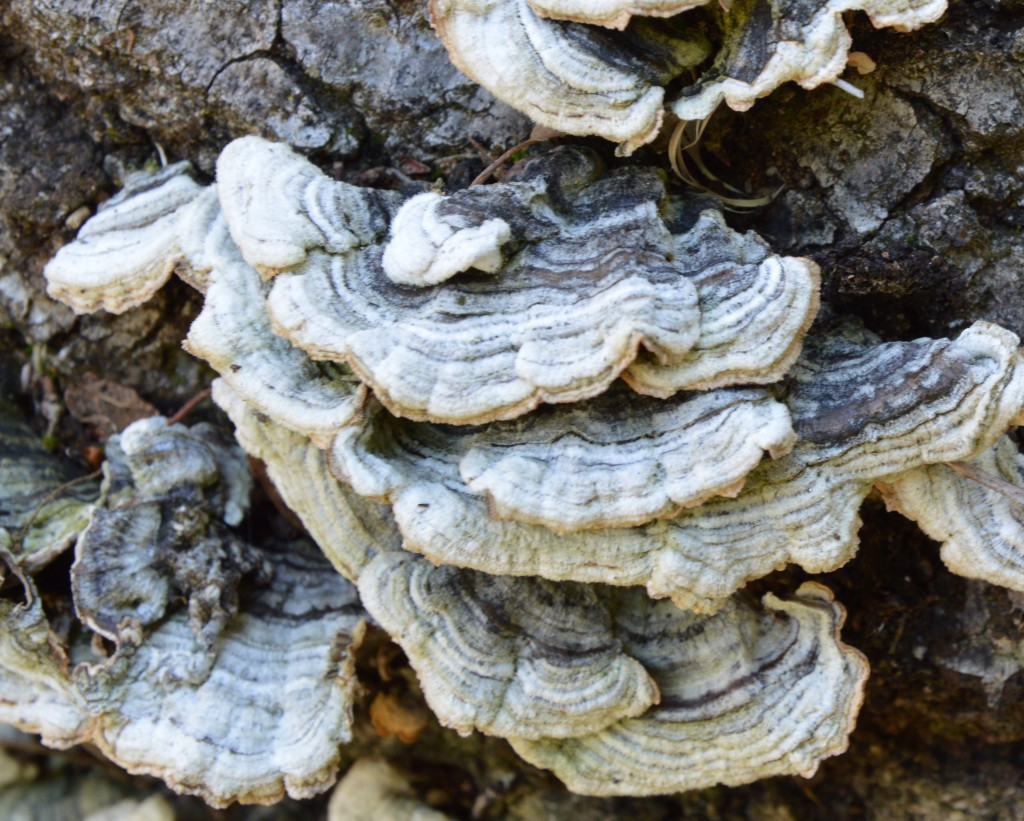
A fallen tree is loaded with turkey tail mushrooms, the very hard shelf mushrooms that grow out of fallen trees like the tree sprouted ears and then fell on its side. I take a couple of pics, break off a few samples with my knife and bag’em.


DSC_0973_Coprinus

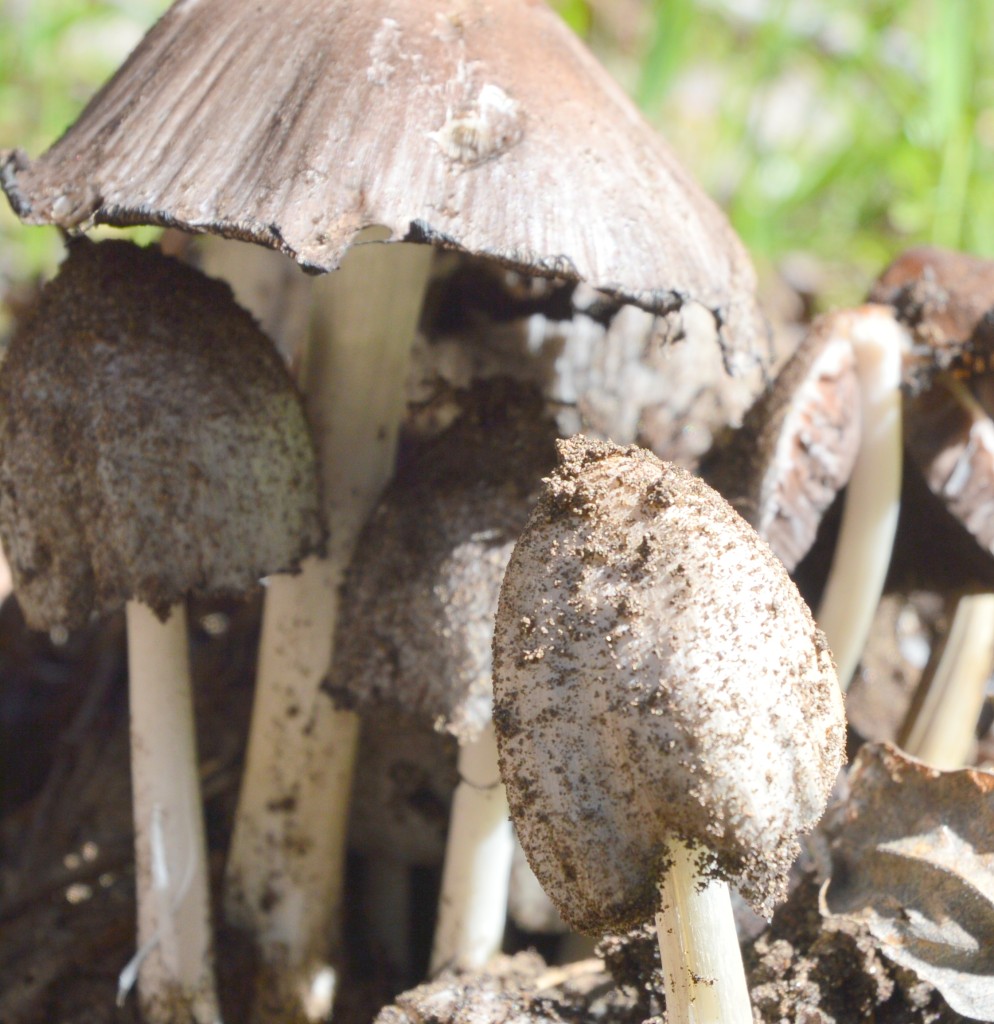
The treasure hunt continues. I finally run into a little forest of coprinus atramentarius. This interesting family of mushrooms is known as the inky caps. These mushrooms deliquese (liquefy), digesting themselves via hydrolytic enzymes. For the moment, they are solid, I clear out some of the ground cover, take some pictures, and only dig out two to take back to the foray staging area, since I know they will not last very long before they turn into a goopey mess.

DSC_0980_FalseMorel

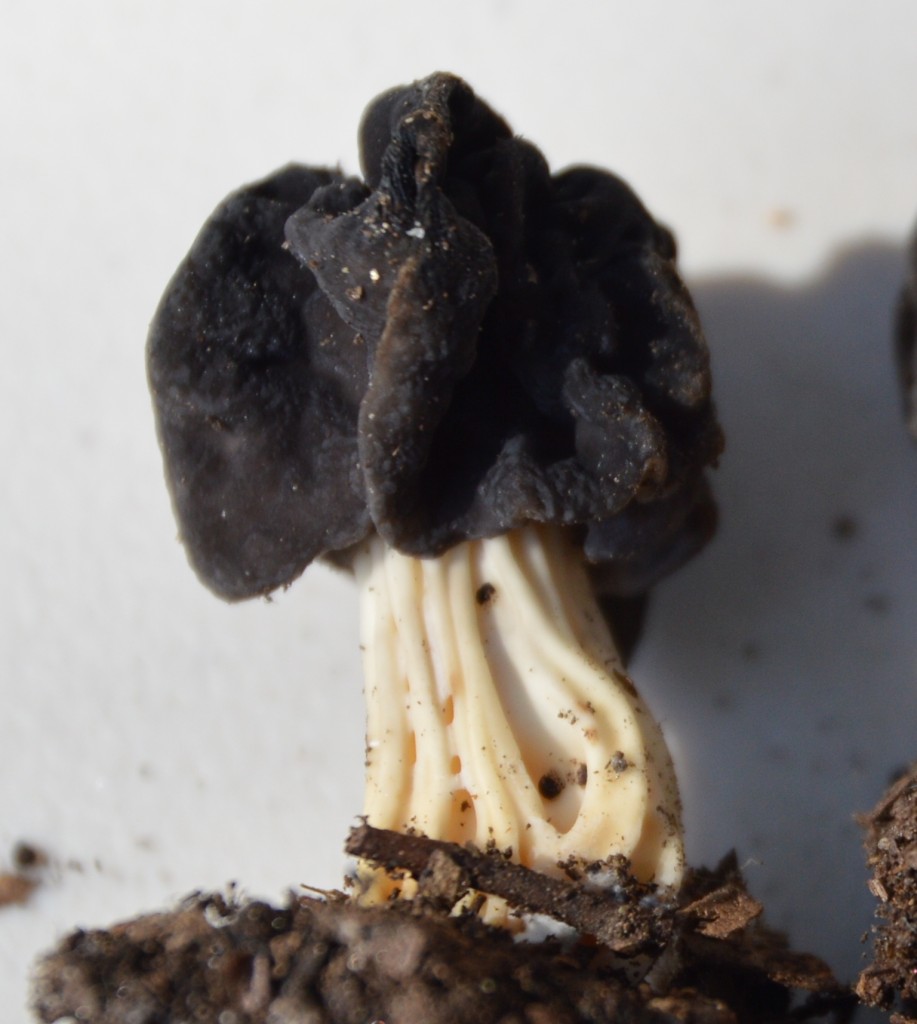
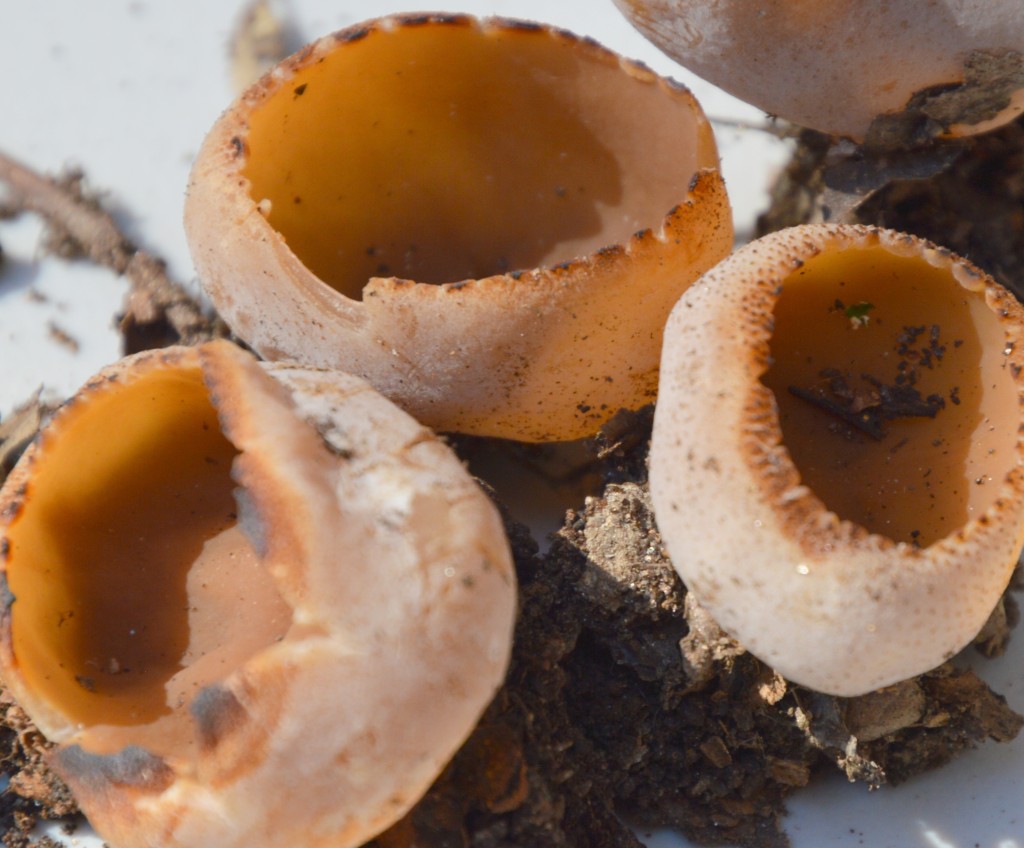
Back at the staging area, a property at the foot of Mount Palomar, other collectors have not found much either but there are a couple of interesting finds: the black-tipped, white-grooved, false morels that contain MMH (jet fuel), some cup fungi that remind me of the tawny, raw-hide chew toys I give the dogs, and the fat-stemmed, blue stained, gilled mushrooms that I’ll have to wait for an expert to identify.


DSC_0983_CupFungi

The owner of the property, sets up lunch, salads, cheeses, cookies, wines and someone even contributed a mead. He tried to start a truffle farm in Southern California by importing the trees from Italy with roots still intact and already innoculated with truffle spores and mushrooms. Success has been elusive due to his nemeses, and mine, the gopher.


Mushroom Cultivation

Reading Time: 4 minutes

Four Weeks Later

Thar be mushrooms!

IMG_0862

Three Weeks Later

11/1/2015. After three weeks in closed bucket with lid on, herIMG_0852e is what the inside looks like. Not the most attractive looking thing, but it looks like the mycelium has completely colonized the straw in the bucket. Now, the plan for the next couple of weeks, is to leave the top open, spray water on the mycelium at least twice a day, to try to induce mushrooms to form.


Step One – Find a substrate

Bought a bale of straw for $9. Only need a bucket full of straw for the amount of mycelium that I have. So I can either get more spawn, or use the straw as mulch in the garden. Or set up a Halloween decoration, use it for spawn, and then use if for mulch.

IMG_0784

Step Two – Cut up the hay

The hay needs to be cut up so it can be further compacted. Compact straw helps the mycelium grow better as the mycelium doesn’t have to spend lots of energy growing to a distant food source. When I had a lawn mower, I would run the lawn mower over the straw. I don’t have a lawn, so I don’t have a lawn mower anymore. I tried using the food processor, but it doesn’t work because the straw is too loose and doesn’t get sucked into the blades. So I did it the slow way, with scissors, cutting up the big pieces down to two or three inches.

IMG_0785

Step Three – Heat

I put the straw and water on the stove and started heating it up. The ideal pastuerization temperature is 145 degrees. Too hot and you sterilize rather than pasteurize. Too cool and you don’t kill the competitive bacteria. I figure I will put the straw in and heat it up rather than trying to overheat the water and guess how much the straw will cool it. If I were mass producing, I might heat up the water and just add to the straw.

IMG_0786

Step Four – Spawn

The spawn comes from attending a lecture on mushroom growing. The species is a type of oyster mushroom, though I am not sure what the numbering code is. The spawn has completely overtaken the grain. I think the bags he uses have a patch that allows for some exchange of oxygen.

IMG_0787

Step Five – Pasteurization

I’ve poured the water and substrate mix into a food safe bucket obtained from home depot. The plastic (polypropelene?) tolerates the heat well. I  push the straw under the water, put a thermometer in the straw, put on the lid, and cover the bucket with a towel for some additional     insulation.

IMG_0789

The system works pretty well. After about an hour and half, the temperature is still almost 140 degrees. The recommended time is about an hour at 145.

IMG_0790

Step Six – Cooling and drying

It is not at all windy outside and I don’t have room in my garage. So I spread the substrate out on a tarp to let it cool down and to let it dry out a bit. Too much moisture inhibits growth almost as much as too little moisture. I leave it out there for about an hour. The heuristic is that it is ready as soon as it is cool to the touch.

IMG_0791

Step Seven – Break up the spawn

I put the straw in another bucket filling it nearly to the top. I’ve drilled quarter inch holes into this bucket so the spawn can breath but not too large so anything can get in and eat it. I break up the spawn and spread it out just under the surface of the straw mixing into the top two or three inches of the substrate. I’m told that oyster is so aggressive, that I don’t need to distribute further and evenly.

IMG_0792
Step Eight – Let it Grow

Put the lid on and find a nice dark and not too hot place. It will stay there for the next three to four weeks while the mycelium feasts on the straw. When the mycelium has take over, I’ll take the lid off and see if I can get entice the mushrooms to grow by allowing light to reach the mycelium and frequently spraying to keep it moist for maximal crop development. Follow on posts will show progress.

IMG_0793